"What's That?" Wednesday: Bleed, Trim, and Safety Area
A while back I created “Thank You” cards to send to the guests that came to our wedding. The last step in sending it to the printer was to place the document between, what simply looked to me like, three different dotted lines. At the time I didn’t know what a “bleed” was and on the website I was printing it from had a dotted red bleed line so I quickly assumed I should NOT extend it to this line. WRONG! I ended up getting them in the mail and there were uneven white lines around all four sides. If you don’t know what a “bleed” is, take the time to read this blog!
Bleed is a term used to describe a document that has images or elements which extend beyond the trim edge leaving no white margin. Bleeds are required in all pieces of art to:
Avoid from cutting something off that is intended to be there
Prevent any white lines around the edges
Avoid issues with mechanical limitations and operator errors
Photo credit: http://lasvegascolor.com
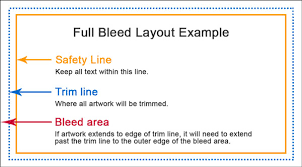
Based on the above picture, the safety line is where text and other important elements that are not meant to be trimmed should be kept within. The actual cut can happen anywhere between the bleeds and the safety line so it is important that you keep anything that needs to be printed within this line. The trim line is where it will be cut so it ends u being the actual, finished size of the product. Always be aware of your trim edges while keeping in mind that there could still be an error while trimming. The bleed is the outermost edge of a finished product. When you extend your image to the bleed area, it guarantees that the finished product will be cut so that there are no white edges (this is the mistake I made). The bleed line is more of a security area, just in case it does not get cut exactly on the trim line. Common bleed lines range from 1/16’’ to 1/4’’ depending on the printer and the method used.
If you are new to this, don’t make the same mistake I made. Take the time to place your product carefully so you won’t end up with lost items or white edges!

